
ゼブラフィッシュ網膜の免疫蛍光染色法
Natalia Jaroszynska著(英国UCL Institute of Ophthalmology、PhD Candidate)
ゼブラフィッシュ(Danio rerio)は、卵生であるとともに胚発生が速く、受精卵・初期胚~幼生(仔魚・稚魚)は光学的に透明であるため顕微鏡下で容易に観察できるという利点を有します。またその他にも数多くの利点を持つことから、ゼブラフィッシュは発生研究に最適なモデル生物の1つとなっています。特に解剖学的にその位置を容易に特定できて顕微鏡で観察しやすい、眼球のような器官・組織の発生研究にゼブラフィッシュは適しています。また、ゼブラフィッシュ眼球網膜は構造や細胞構成の大部分がヒト網膜と一致しています。そのため、ヒトやマウス・ラット等の哺乳類動物で十分に特性解析がなされた、種間で遺伝的に保存されている多数のマーカーを適用することができます。そのような各種マーカーに対する抗体を用いて特定細胞種や対象構造を標識することで、網膜の発生メカニズムを詳細に解析することができます。これらのことからゼブラフィッシュは眼球の網膜形成の発生メカニズムを研究するうえで非常に良いモデル生物と言えます。
「免疫蛍光染色(IF:Immunofluorescence)」は、世界中のライフサイエンス研究において最も広く用いられている実験手法の1つです。数多くの信頼性の高い標準プロトコールが論文等で公表されています。ブログ著者の所属する研究室では長年にわたりゼブラフィッシュ網膜の免疫蛍光染色法の最適化に取り組み、その技術を向上させてきました。本稿では、ゼブラフィッシュ網膜の免疫蛍光染色の手順を包括的にレビューし、その他の組織にも応用可能なヒントとコツを紹介します。
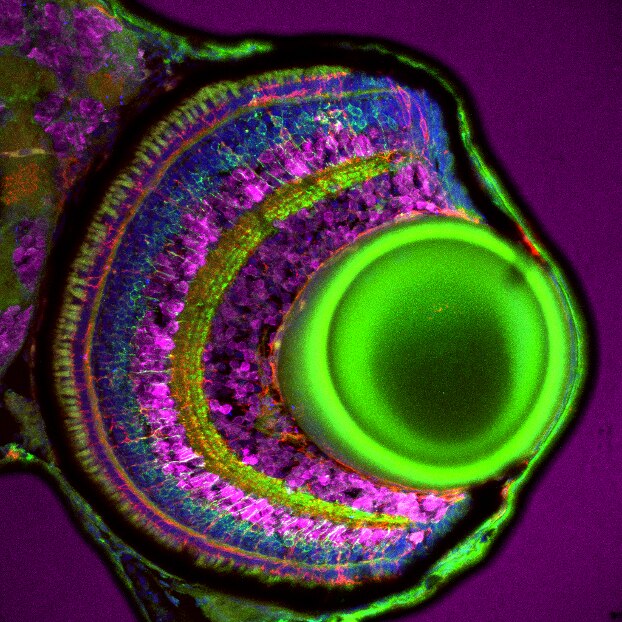
図1. 受精後5日目のゼブラフィッシュ網膜の組織切片における双極細胞の免疫蛍光染色像。緑:pan-PKCポリクローナル抗体(カタログ番号:12919-1-AP、希釈倍率1:300)。組織:4% PFAで一晩固定した。赤:ミュラーグリア細胞、青:DAPI、マゼンタ:HuC/D。撮影:Natalia Jaroszynska(英国University College London、Dr. Ryan MacDonald’s lab)。
免疫染色の基本原理
免疫蛍光染色とは、抗原特異的な抗体を利用して主に細胞や組織内のタンパク質を可視化する実験手法を指します。固定細胞や組織切片等の構造を維持した状態のサンプルに直接適用し、研究対象の特定細胞種や組織・細胞内構造をin situで検出することができます。間接免疫蛍光染色(Indirect IF)の場合、最初にターゲット特異的な一次抗体溶液とサンプルをインキュベーションします。一次抗体は抗原特異的に結合する抗体を選択し、多重染色の場合はそれぞれの一次抗体が異なる免疫動物種(宿主)由来の組み合わせとなるよう選択します。続いて、一次抗体の免疫グロブリンアイソタイプと特異的に結合する、一次抗体とは異なる免疫動物種で産生された二次抗体とインキュベーションします。特定の波長の蛍光色素が共有結合により標識された二次抗体を使用することで、抗原抗体反応により蛍光標識された目的タンパク質を標準的な蛍光顕微鏡を使用して可視化・観察することができます(図2)。
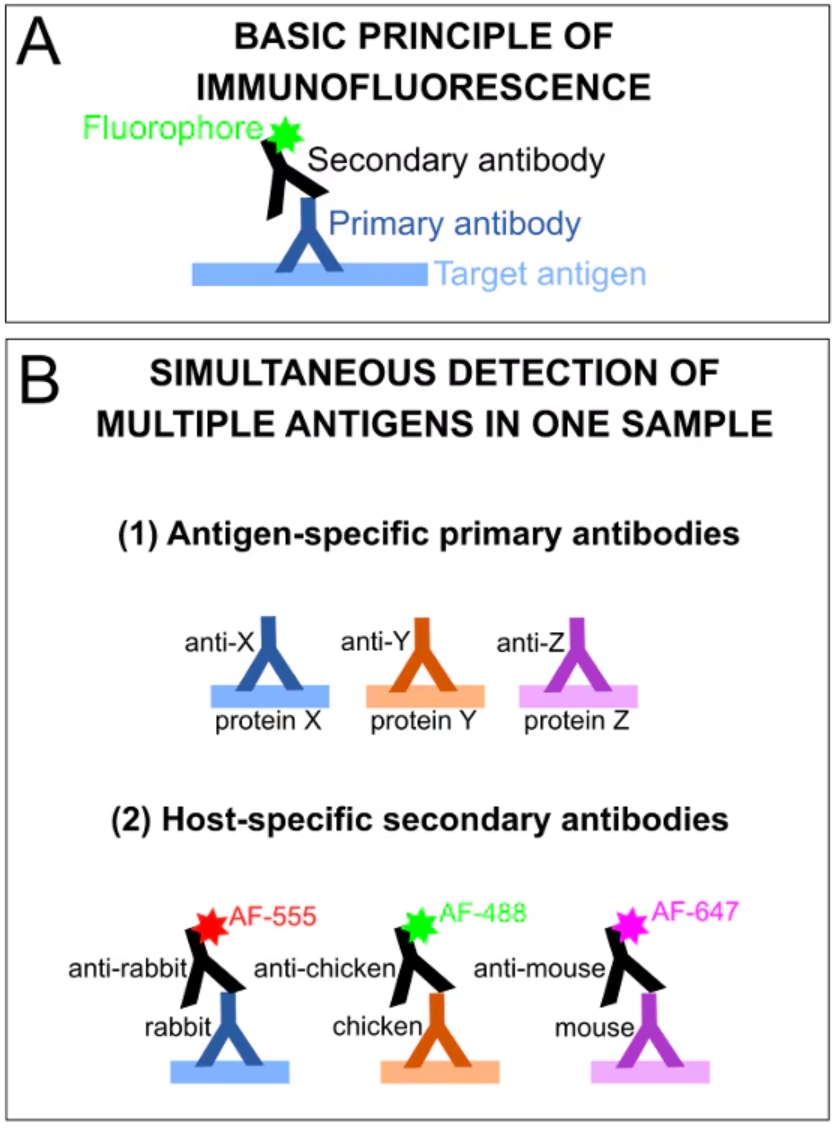
図2. 免疫蛍光染色法と抗体‐抗原検出の基本原理
はじめに
組織サンプルの前処理・調製
あらゆる実験において最も重要なことは、事前の計画と準備であるといっても過言ではありません。最良の染色結果を得るには、使用する組織の品質と状態が極めて重要となるため、可能な限り新鮮な組織を使用するか、下流のアプリケーションに使用するまでサンプルを適切に保存するよう留意します。さらに、組織の固定処理が重要なポイントとなります。最適な結果を得るには、新鮮な組織を使用するか、解凍したばかりの組織を使用して(凍結融解を繰り返してはなりません)、4%パラホルムアルデヒド(PFA:Paraformaldehyde)による固定処理を実施します。固定処理ステップとしてゼブラフィッシュの組織や幼生を4℃で一晩インキュベーションする場合、穏やかに振とうしながら実施し、組織全体を固定液に均一に浸漬し撹拌するように留意します。固定後の実験的処理はアプリケーションによって異なります。凍結組織切片の免疫染色を実施する場合は、固定処理済みサンプルを凍結包埋するにあたり、氷晶形成を防ぐ目的で凍結保護剤として働く30%スクロース溶液中で事前にインキュベーションしなければなりません。その際、冷蔵庫の中で一晩インキュベーションしてから、凍結組織包埋剤による包埋・凍結とクライオスタットによる薄切を実施することを推奨します。
研究者からのヒント:スクロース溶液に浸漬した組織は、微生物や菌の増殖、目的タンパク質の分解を防ぐために、1週間以上そのままの状態で保存しないでください。組織を長期間保管する場合は、凍結組織ブロックまたは凍結切片の状態で-20℃~-80℃で保存することを推奨します。
ゼブラフィッシュ網膜のホールマウント免疫染色を実施する場合は、染色前に固定処理した幼生サンプルをPBSで洗浄します。より新鮮な組織を速やかに染色実験に供することが理想的ですが、固定処理後にただちに染色プロトコールを実施しない場合、固定処理した幼生サンプルをアジ化ナトリウム含有PBSに浸漬しておくことで4℃で最大2週間保存することもできます。アジ化ナトリウムは防腐剤として機能し、微生物や菌類の増殖を防ぎますが、HRP酵素等の活性に影響を与えることがあるため、検出法によってはその染色性に悪影響を与える場合があります。
専門家のヒント:洗浄作業時に幼生サンプルがピペットに付着する場合は、0.1% Triton-X含有PBSまたは0.1% Tween-20含有PBSを使用して洗浄操作を実施してみてください。Triton-XやTween-20は共に一般的な界面活性剤です。界面活性剤を添加することで組織透過性も高まり、一連の長時間にわたる洗浄作業に有利に働きます。
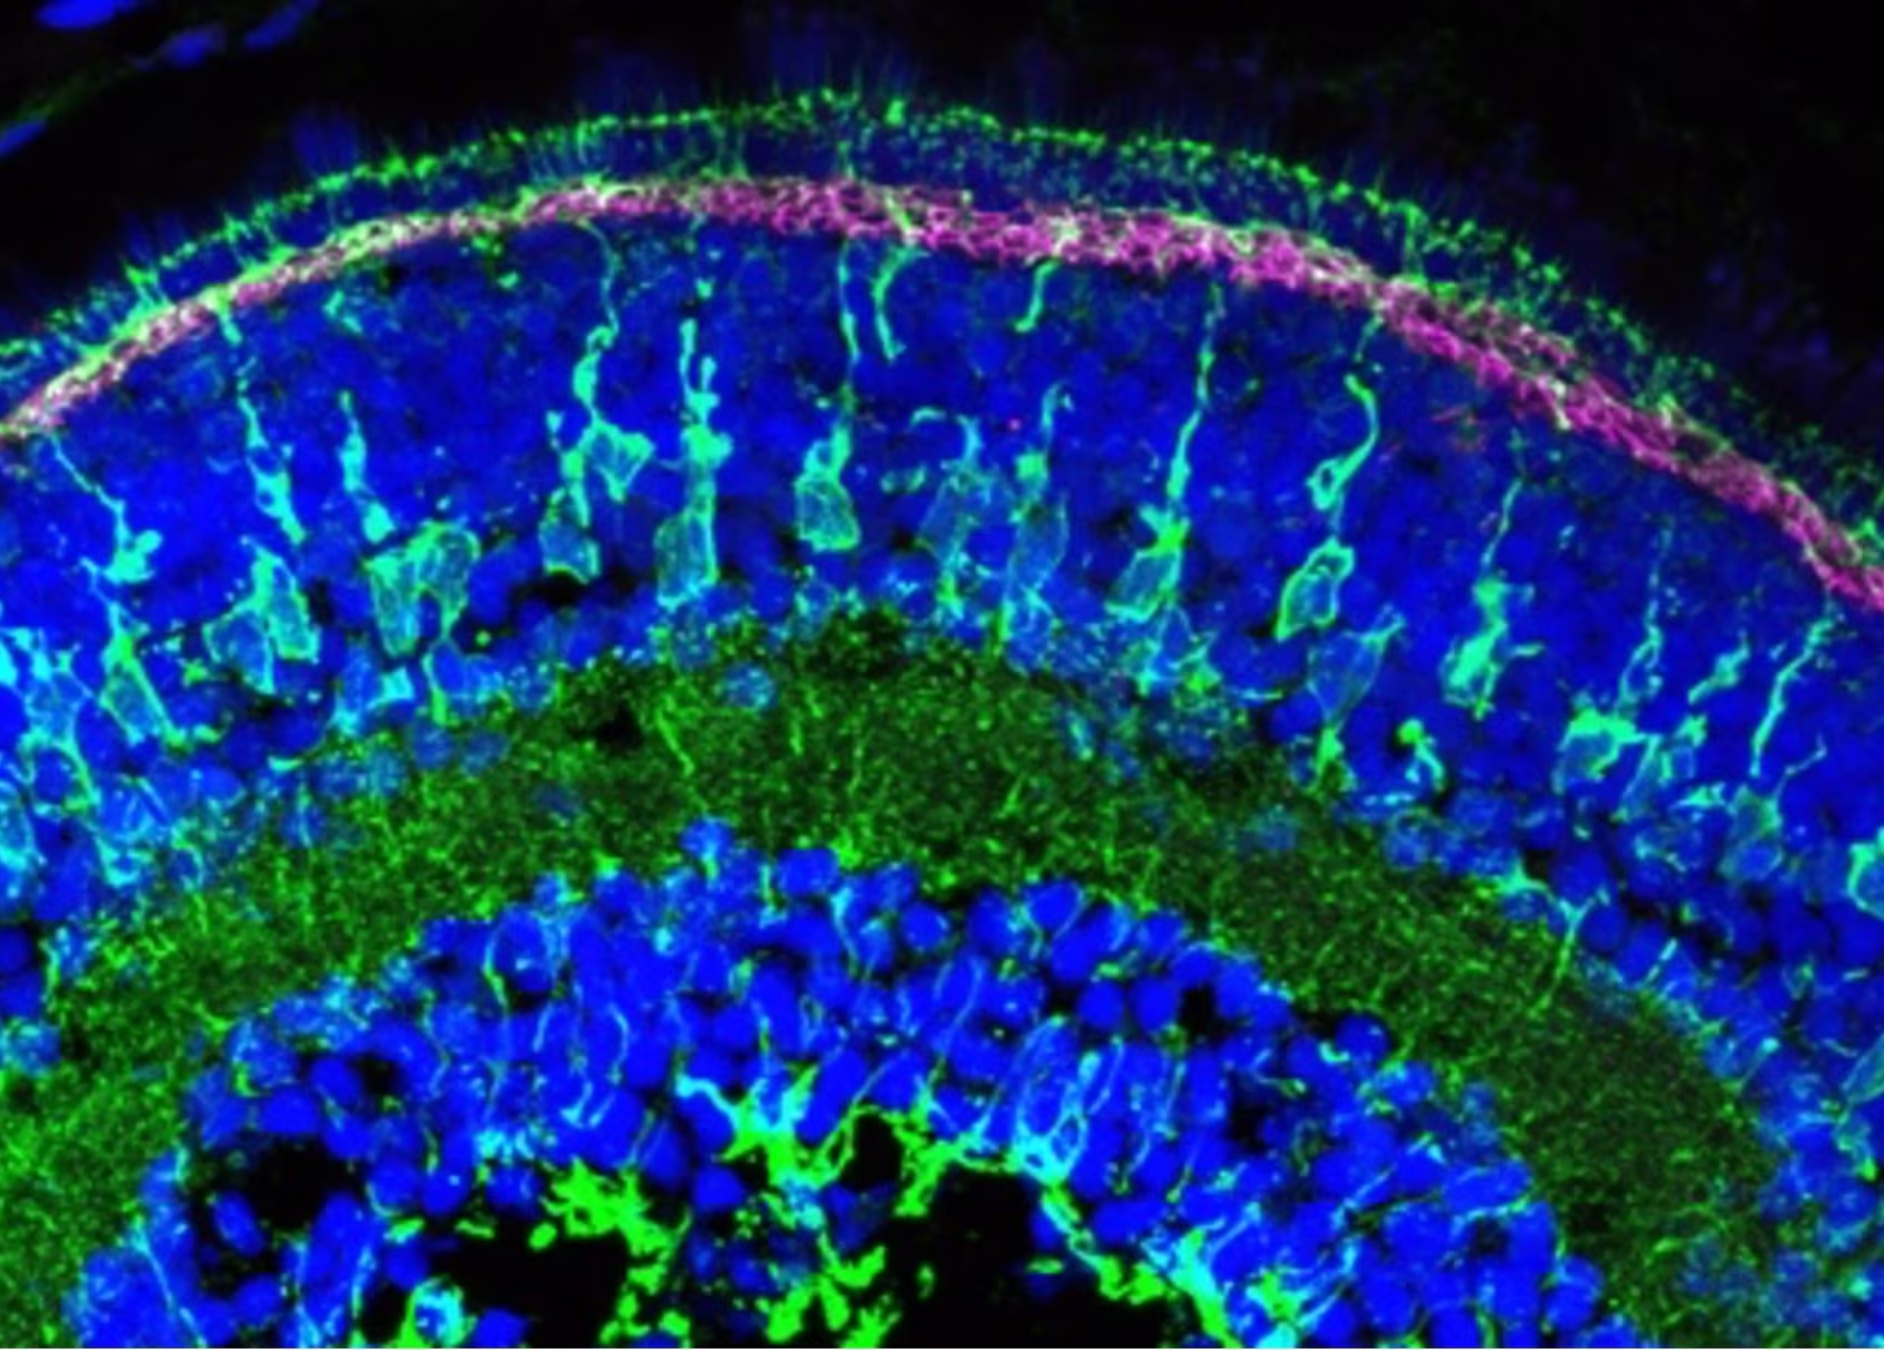
図3. 受精後5日目のゼブラフィッシュ網膜の免疫蛍光染色像。マゼンタ:COL18A1(Endostatin)ポリクローナル抗体(カタログ番号:18301-1-AP、希釈倍率1:200)、緑:Glutamine Synthetaseモノクローナル抗体(カタログ番号:66323-1-Ig、希釈倍率1:500)。組織:4% PFAで一晩固定した。青:DAPI。撮影:Natalia Jaroszynska(英国University College London、Dr. Ryan MacDonald’s lab)。
免疫染色
ステップ1:組織の透過処理
組織の透過処理ステップでは、最大限に抗体が組織へ浸透するように、Triton-XやTween-20等の界面活性剤を使用して、対象の組織や細胞を穏やかに透過処理します。細胞内に存在する抗原を検出する場合、細胞膜の透過処理を施すことで抗体が細胞内のタンパク質にアクセスできるようになるため、このステップは特に重要なステップです。ホールマウント免疫蛍光染色の場合、洗浄・各インキュベーション操作はエッペンドルフチューブ内で実施します。完全な網膜は組織切片よりも密度が高いため、洗浄・各インキュベーション時間を延長する必要があります。
研究者からのヒント:ホールマウント染色する際に抗体の浸透性を向上させたい場合、界面活性剤の濃度を標準的濃度である0.1%から1%に変更してみましょう。網膜のように厚みがあり密度の高い組織を透過処理する場合、界面活性剤の濃度変更は大きな効果があります。
ステップ2:抗原賦活化
研究室によっては省略されることも多いステップですが、免疫染色プロトコールにおける抗原賦活化は重要なステップです。その名称が示すように、抗原賦活化は抗原の利用可能性/有効性を最大化し、抗体が標的とする抗原に結合できるようにするためのステップです。ブロッキング処理や抗体とのインキュベーション前に、組織切片やホールマウント網膜を酸性バッファー(クエン酸バッファー、pH 6.0)または塩基性バッファー(Tris-HClバッファー、pH 9.0)中で15~20分間加熱することで抗原賦活化は実施されます。当然ながら、各タンパク質は独自のフォールディングパターンを持ち、三次元コンホメーションはpH条件に影響を受けます。したがって、検出しようとしている特定のタンパク質の性質に依存して抗原賦活化の実施の有無や賦活化条件を決定します。
一般的には、新規抗体を使用する場合はその都度コントロール実験を実施して、クエン酸バッファー(pH 6.0)やTris-HClバッファー(pH 9.0)で抗原賦活化処理を施した場合と、抗原賦活化処理を実施しなかった場合の組織染色のクオリティを比較します。対象の抗体に最適な抗原賦活化法を把握した後に、実際のサンプルの抗原賦活化処理を実施します。また、ゼブラフィッシュやメダカのホールマウント免疫蛍光染色の場合、Wittbrodtらが加熱により抗原賦活化法を実施し、氷冷アセトンに浸漬して-20℃で20分間透過処理する方法により、染色性が劇的に向上することを示しています。その際、100%氷冷アセトンに浸漬したサンプルを冷凍庫の中で20分間インキュベーションし、その後PBST(1×PBS、pH7.3、0.1%Tween)で十分に洗浄します。
研究者からのヒント:スライドサンプルの抗原賦活化を実施するためのインキュベーターやオーブンがない場合は、電子レンジやブログ著者が所属するMacDonald研究室のようにシンプルな仕様の炊飯器(Rice cooker)を使用しても良好な結果を得ることができるため、このような代替品の利用をおすすめします。ホールマウント免疫蛍光染色の場合、幼生サンプルをエッペンドルフチューブ内で抗原賦活化バッファーに浸漬し、70℃に設定したヒートブロック上で15分間インキュベーションします。抗原賦活化処理後、直ちにアセトン処理を実施するよう留意します。
ステップ3:抗体染色
抗体添加前に、スライドサンプルの場合はブロッキング溶液を添加し室温で1時間、幼生全体のサンプルの場合はブロッキング溶液を添加して振とう器にセットし、室温で2時間インキュベーションします。その後、同じ組成のブロッキング溶液(例:10%ヤギ血清・1% BSA・0.1% Triton-X含有1xPBS)で一次抗体含有バッファーを調製し、サンプルが十分に覆われる程度にスライド上に少量の抗体溶液を添加します。一晩のインキュベーション中に溶液が蒸発するのを防止するのに加え、抗体溶液が均一に広がるように、長方形のパラフィルムをスライドに静かに被せておくことを推奨します。抗体溶液の蒸発を防ぐ目的で、抗体染色のステップは常に密閉した湿潤箱で実施します。専用の湿潤箱がない場合は、染色トレイやプラスチック製のスライドトレイの底に水で湿らせたペーパータオルを置くか、水を注いで用意することができます。ホールマウント免疫蛍光染色で、特に網膜のような厚みのある組織を染色する場合は、ゼブラフィッシュ幼生をエッペンドルフチューブ内で、4℃で48時間以上インキュベーションすることを推奨します。インキュベーション後、適切な二次抗体で染色する前に、サンプルを0.1% Triton X-100含有PBSで20分間インキュベーションする操作を少なくとも3回繰り返し、未反応の一次抗体を完全に洗浄除去します。二次抗体によるインキュベーション後は、蛍光色素が消光するのを防ぐために、アルミホイル等を利用して遮光し、サンプルを光褪色から保護しなければなりません。凍結切片の場合、二次抗体溶液を添加し2時間インキュベーションした後、0.1% Triton X-100含有PBSで未反応の二次抗体を完全に洗浄除去し、任意の封入剤を滴下してからカバーガラスを乗せて封入します。これで全ての免疫蛍光染色工程が完了します。
研究者からのヒント:スライドに溶液(例:洗浄バッファー)を添加する際は、穏やかに添加することが重要です。ゼブラフィッシュ幼生の切片は極めてデリケートかつ微小でスライドから脱落しやすいため、ピペット等で切片上に溶液を直接添加するのではなく、組織サンプルの隙間に溶液を添加します。
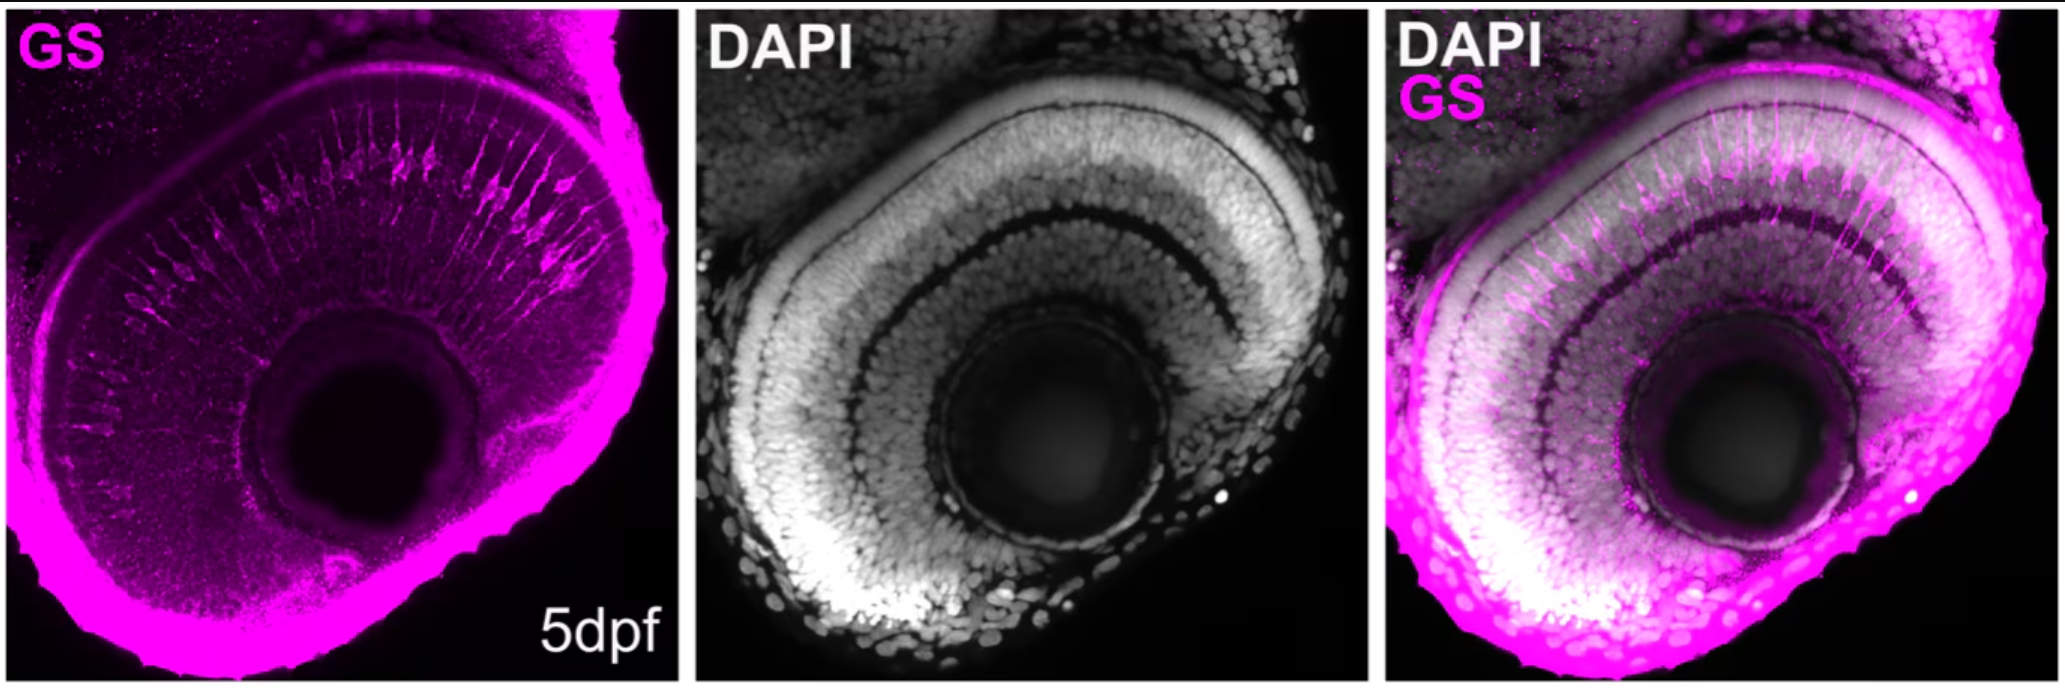
図4. 受精後5日目(5dpf)のゼブラフィッシュ網膜の組織切片におけるグルタミン合成酵素(GS:Glutamine synthetase)のホールマウント免疫染色。マゼンタ:Glutamine Synthetaseモノクローナル抗体(カタログ番号:66323-1-Ig、希釈倍率1:500)、白:DAPI(40x対物レンズ使用、6xズーム)。組織:4% PFAで一晩固定した。撮影:Natalia Jaroszynska(英国University College London、Dr. Ryan MacDonald’s lab)。
イメージング
ついに結果を確認する顕微鏡撮影(イメージング)のステップです。イメージングのステップは、使用する蛍光顕微鏡の種類によって撮影手順が異なります。網膜のようなサンプルは厚みがあるため、ブログ著者所属研究室ではZ-stack画像を取得できる共焦点顕微鏡を使用していますが、代替手段として光シート(Light sheet)顕微鏡のような、共焦点顕微鏡とは異なる撮影原理の顕微鏡でも深部の優れた画像を撮影することが可能です。使用する顕微鏡の選択は、取得したい画像、サンプルの特性、利用可能なリソース等の多岐にわたる要素に依存します。それぞれの顕微鏡には独自の強みがありますが、ゼブラフィッシュ幼生の組織切片やホールマウントサンプルの高解像度撮影には標準的な共焦点顕微鏡の使用をおすすめします。凍結切片スライドを撮影する場合、40x対物レンズで網膜の細部画像を確認し、光学ズーム機能で幼生の眼の全体像や特定の領域を確認します。20x対物レンズで幼生頭部全体を撮影することもできますが、細部の解像度は低くなります。常に、撮影画像の使用用途を意識して撮影条件を決定するようにしてください。
倒立型共焦点顕微鏡システムを使用して網膜全体を撮影する場合、まずは染色済みの幼生サンプルを、目的組織の撮影に最適なポジションを維持するために埋め込む必要があります。その際、網膜サンプルは市販されている顕微鏡撮影用に最適化されたガラス底のイメージングディッシュやマルチチャンバースライド上に、PBSで調製した1%低融点アガロース(w/v)で包埋します。撮影用に幼生サンプルを包埋するには、ヒートブロック上にアガロース片を乗せて溶解し、~40℃まで放冷します。アガロースでサンプルが加熱されないようにする必要がありますが、それと同時に、アガロースが固まる前に幼生サンプルを適切な方向に配置する時間を確保するには、アガロースの流動性も求められます。アガロースが添加されたチューブに幼生サンプルを移し、軽く混和します。パスツールピペットを使用して胚を吸い上げ、イメージングディッシュのガラス部位に移し、アガロースのドームを作ります。次に、先が細長いローディングチップや、シリンジ針、細いピンセットのように精密な作業ができる小さなツールを使用して、幼生サンプルを適切なポジションへ移動させます。アガロースは急速に固まるため、素早く作業するよう留意します。アガロースが固まったら、アガロースの乾燥を防ぐためにディッシュにPBSを添加し、顕微鏡が設置された部屋やチャンバーの温度に慣らしてから撮影を実施します。撮影中の温度を一定に保つことで、Z-stack画像取得中にサンプルがドリフトするのを防ぎます。
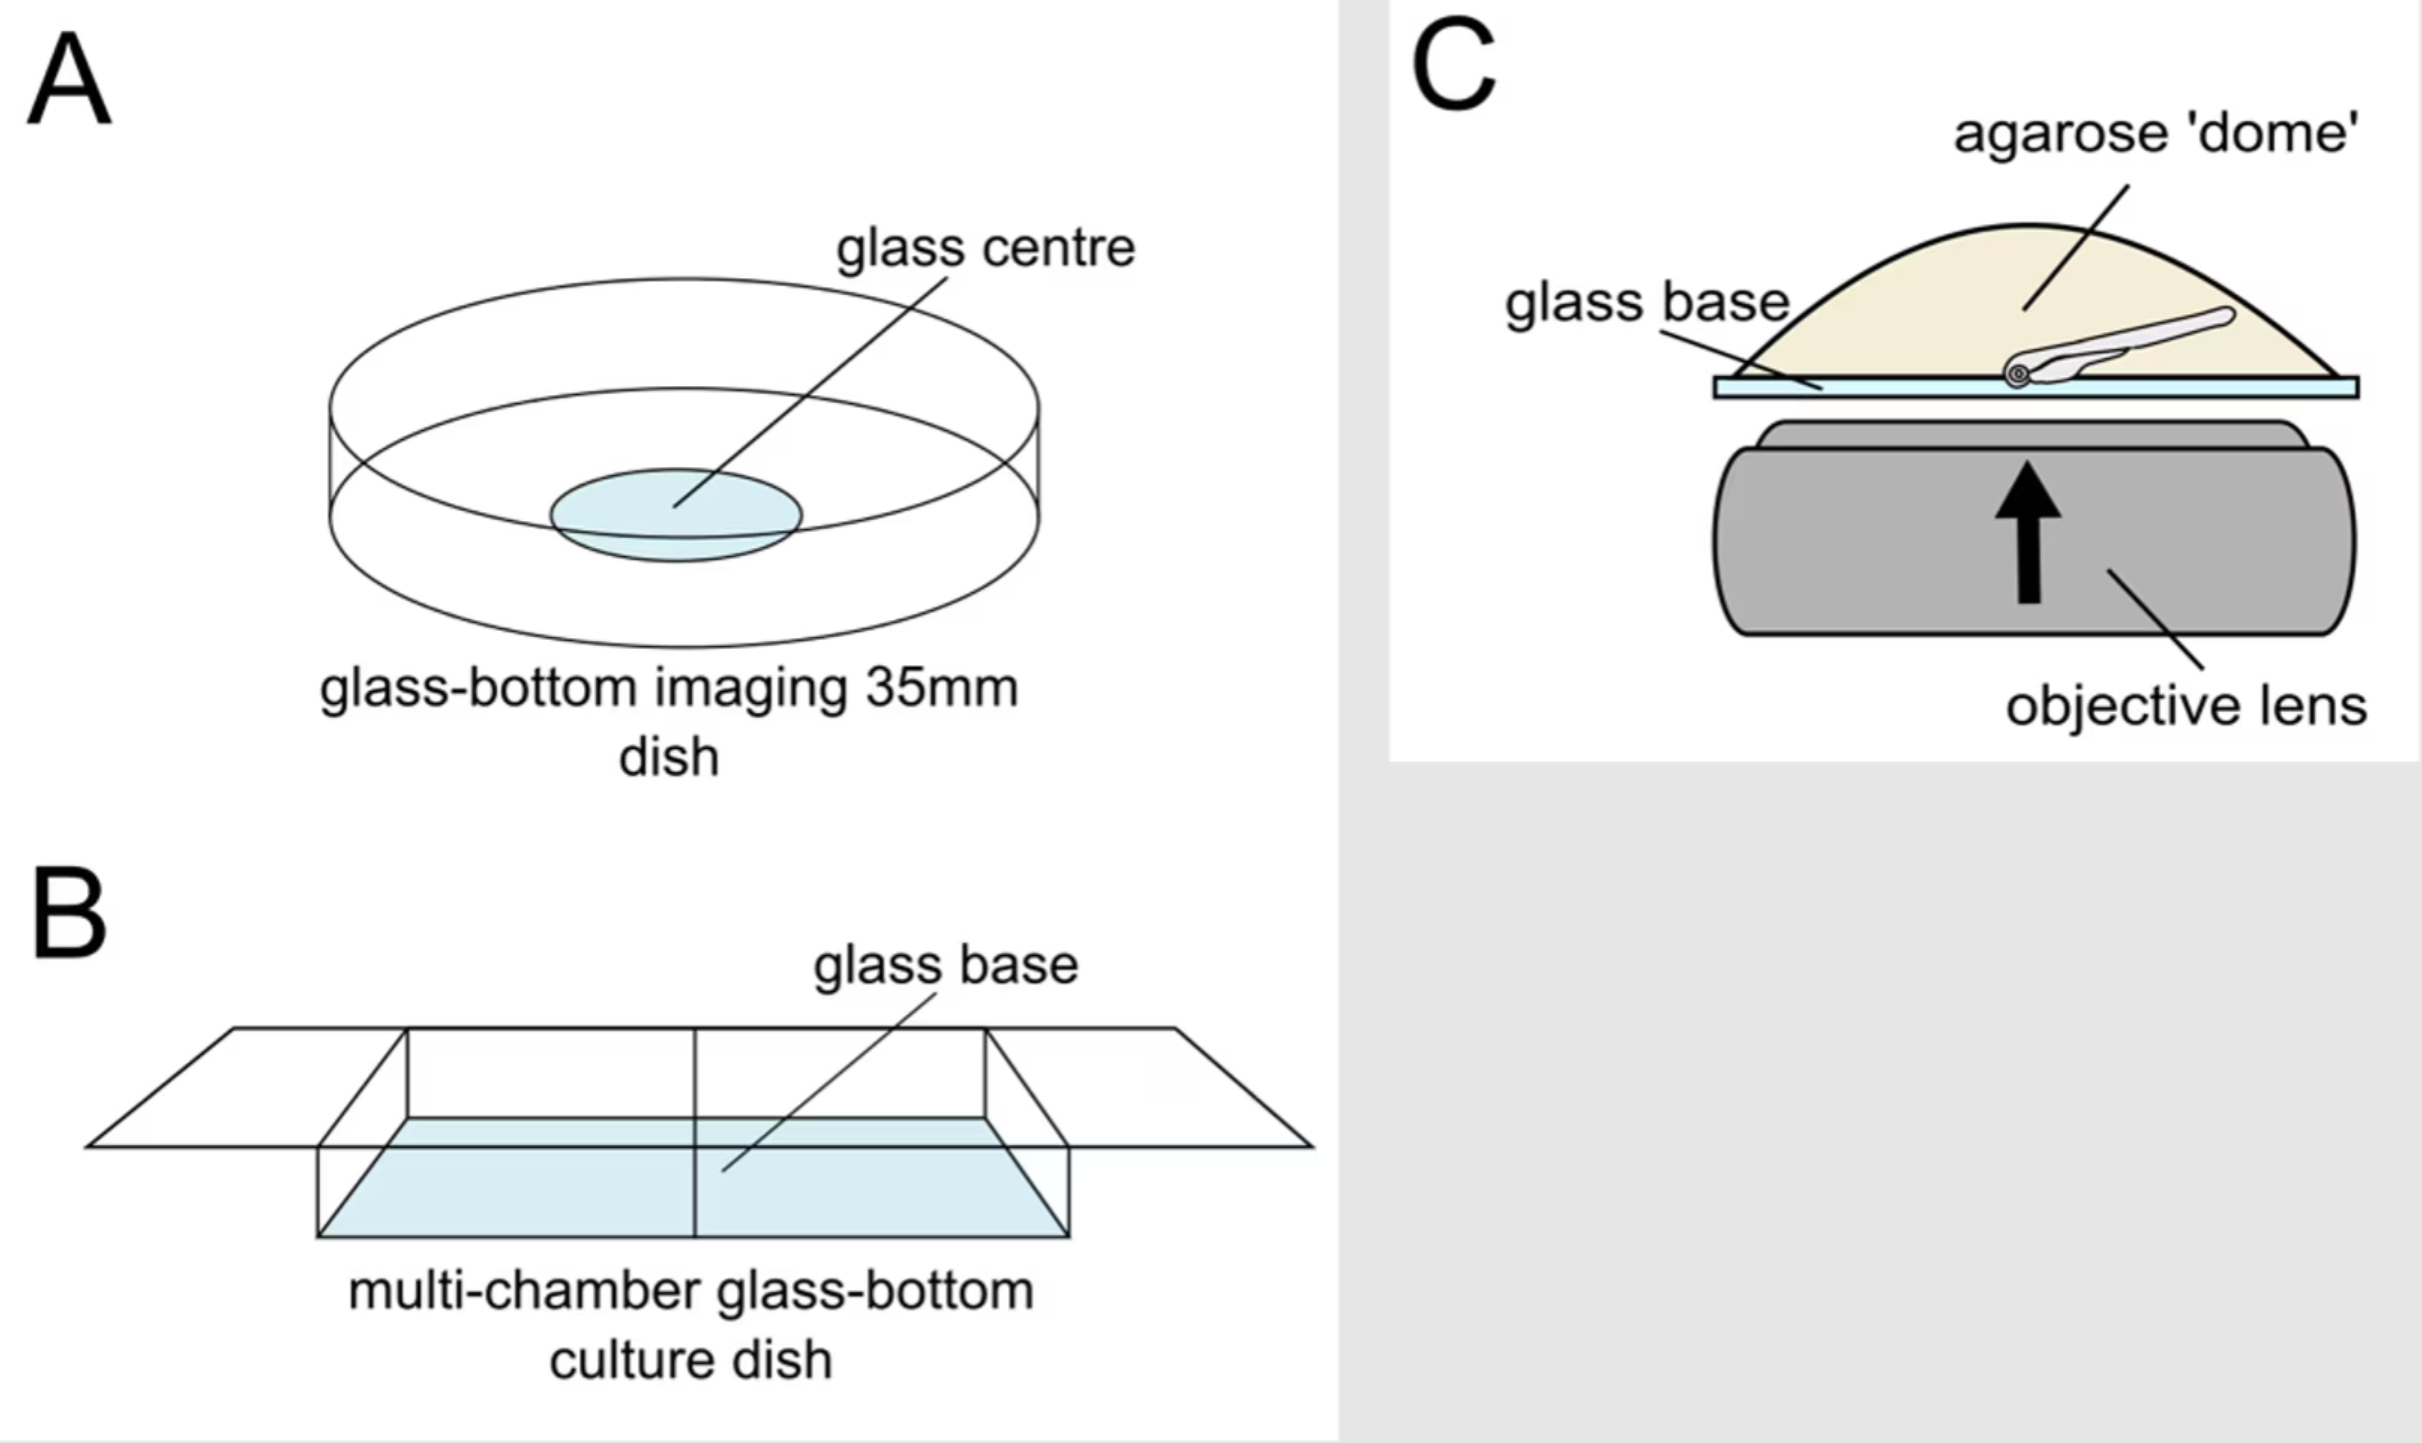 図5. 幼生サンプルのマウントと撮影
画像取得パラメータは、実験の中でも極めて重要な構成要素です。画像の詳細な三次元解析を実施するには、スキャン速度を遅くしてピクセル平均化するだけでなく、Z-stackの各スライス間のインターバルを小さくして、高解像度の画像を撮影します。撮影時のパラメータは、画像の取得目的や解析方法に合わせて設定します。最も重要な点は、レーザー出力値の微調整です。レーザー強度が強すぎてピクセルが飽和していないか注意してください。データ取得後のゲイン(Gain)の調整はどの段階でもできますが、飽和したシグナルを取り去ることはできません。
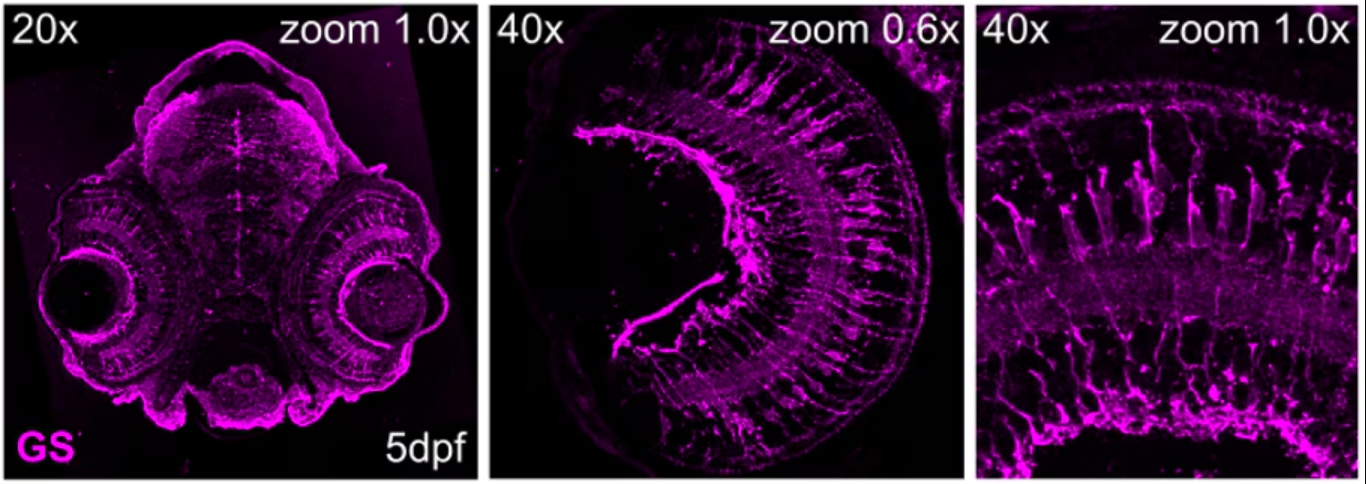
図6. 受精後5日目(5dpf)のゼブラフィッシュ網膜の組織切片におけるグルタミン合成酵素(GS:Glutamine synthetase)の免疫染色像。マゼンタ:Glutamine Synthetaseモノクローナル抗体(カタログ番号:66323-1-Ig、希釈倍率1:500)(20x対物レンズまたは40x対物レンズを使用、1xズームまたは6xズームで撮影)。組織:4% PFAで一晩固定した。撮影:Natalia Jaroszynska(英国University College London、Dr. Ryan MacDonald’s lab)。
参考文献