ゲスト寄稿 | 免疫蛍光染色 (IF) のコツ
培養細胞を免疫蛍光法 (IF) で染色する時のコツを解説します。
By Nancy Kedersha
Researchers undertaking immunostaining face a range of technical hurdles, which can be the difference between obtaining crisp and informative images, a muddled mess or no signal at all…” Says Nancy Kedersha, Instructor of Medicine at Harvard Med School, and Director of the Confocal Microscopy Core at Brigham and Women’s Hospital. “Worst of all, the outcome could be something that looks very specific, but is misleading or plain wrong.”
In this guest blog post, Nancy offers her expert advice on immunostaining and highlights things to consider when planning your imaging experiments using cultured cells…
Find the right working environment…
(…AKA, optimize your buffers.)
Antibodies are optimized by the immune system to work in the blood’s sodium rich environment — hence why phosphate buffered saline (PBS) is usually the buffer of choice for cell surface staining. Yet the intracelluar environment is predominated by potassium, and efforts should be made to recreate these conditions.
The buffer system employed during the incubations and washes after fixation (see below) and permeabilization can make a tremendous difference to signal intensity. Buffers such as PHEM or CSK were developed for use in permeabilized, unfixed cells in function-based assays; such buffers can be used on fixed and permeabilized cells instead of PBS, and are especially helpful with cytoskeletal or cytoplasmic antigens.
In terms of signal intensity (and based on my own finite experience), roughly 10% of cellular antigens stain significantly better in PHEM buffer than PBS, 50% stain moderately better in PHEM buffer and 30% show no difference. The remaining 10% stain much better in PBS! So I routinely try both PHEM and PBS when using an antibody for the first time. There’s also a selection of other buffers you may wish to experiment with (see below.)
| Buffers: |
|
(There's more than just PBS out there!) PHEM Buffer: 60mM Pipes, 25mM Hepes, 10mM EGTA, 2mM MgCl2 PH 6.9 (reference: Sobue et al., PNAS 85: 482-486, 1988). KM Buffer: 10mM MES, PH 6.2, 10mM NaCl, 1.5mM, MgCl2, 10% glycerol, 100 KUI aprotinin. (reference: from Staufenbiel and Deppert 1984, JCB 98: 1886-1894) CSK Buffer: 10mM Pipes, PH 6.8, 100mM, NaCl, 300mM (10% w/v sucrose, 3 mM MgCl2, 1mM EGTA. CSK Extraction buffer: CSK plus 4mM Vanodyl riboside complex, 1.2mM, PMSF, 1.0% (v/v) Tween 40, 0.5% (v/v) sodium deoxycholate. |
Choose the best fixative…
(…for your antigen-antibody combination.)
The nature of immunostaining protocols pose other challenges in addition to changing the optimal working environment: keeping cells as intact as possible during all those incubations and washes is a priority. Here, fixation is a critical step; its goal is to maintain cellular structure as close as possible to the native state. Once fixed, you can proceed with the staining protocol without losing the protein of interest or, indeed, the rest of the cell. Fixation, however, does destroy antigenic sites, so keep in mind that different antibody-antigen combinations may work poorly with one fixative, but very well with another. When determining staining procedures for a new target, especially of uncertain localization, or when working with a new antibody, one should try several conditions of both fixation and buffers to find the right balance of antibody binding and structural integrity.
There are two classes of popular fixatives to select from: aldehyde fixatives and organic solvents. Each class has its advantages and disadvantages, so when you are dealing with a new antibody or uncharacterized target it’s good to try more than one method.
Aldehyde fixation, using formaldehayde or glutaraldehyde compounds, crosslinks proteins to the cytoskeleton and elements of the cytoskeleton to one another. Therefore this is the method of choice for double labeling of membrane bound and cytoskeletal antigens. However, this method modifies proteins chemically, which can potentially destroy antigens. This usually isn’t a problem when fixing cells (typical cell-fixation protocols use 2-4% paraformaldehyde for 10-20 minutes), but aldehyde fixation of tissues requires very long treatments to allow sample penetration — whichcan alter protein structure. Avoiding prolonged fixation times in both cells and tissues is advised when using aldehydes where it is possible to do so. Aldehyde use may also require a step called ‘quenching‘ which reduces autofluorescence (aldehyde fixatives react with amines and proteins to generate fluorescent products.)
Organic solvents, such as methanol, ethanol and acetone, don’t alter target proteins covalently; essentially, they precipitate proteins out of solution maintaining a protein “shell”, but ‘flattening’ cells as protein solubility is reduced. This makes nuclear and mitochondrial penetration more difficult, and also removes lipid-linked proteins as lipid content is not protected. However this method might be advantageous for use with certain antibodies (especially some monoclonal antibodies which bind only one epitope) that target antigens naturally buried within internal protein structures.It is the method of choice for cytological preservation and suitable for cytoskeletal staining.
A note on formaldehyde
People often confuse the terms formaldehyde, paraformaldehyde and formalin. Formaldehyde is CH2O, the simplest aldehyde. Paraformaldehyde is actually polymerized formaldehyde and comes as a powder that requires heating in a fume hood to dissolve. Once made up it is slow to penetrate cells, and does not usually permeabilize them enough for antibodies to access cells the cell interior. Often a secondary permeabilization step is required (see below).
Formalin is a liquid that contains 37% formaldehyde, and usually has 10-15% methanol added to prevent formaldehyde polymerization. Pay caution to the presence of methanol in formalin for the reasons outlined in the organic solvents section above. A protocol requiring 10% formalin is roughly equivalent to 4% formaldehyde and also contains enough methanol to partially permeabilize cells, but not enough to do so consistently unless the fixation is performed over a long period.
To fix or not to fix…
(Should you fix your cells?)
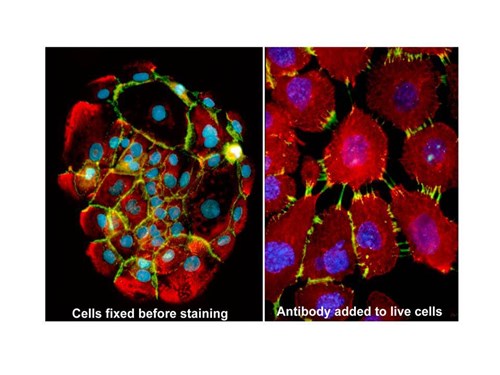
Fixation can damage or mask antigenic sites, thereby compromising the intensity of your immunostaining. Sometimes it might be worth experimenting with adding the antibody prior to or even without fixation. This approach is especially relevant to proteins exposed on the cell surface (see figure 1.), so first identify whether your target is situated here or not by simply adding the antibody to the culture medium. Proceed with caution; many cell surface molecules are internalizing all the time, or internalize when crosslinked (and antibodies are bivalent so can serve to facilitate this!) Moreover, some antigens involved in cell-cell adhesion can be functionally affected by antibody binding.

Figure above: Example of antibody addition after (L) and before fixation (R). Cells were stained with the same anti-cadherin antibody (shown in green) — on the left, the antibody was used to stain paraformaldedye-fixed, methanol permeabilized cells; on the right, the antibody was added to the growth medium while the cells were alive. In this example, the left image shows the “real” location of the undisrupted protein —but the data shown by the image on the right indicates that the target of this particular antibody is clearly functionally important in the context of cell adhesion, which might be useful information to have if you are studying this process!
Permeabilization
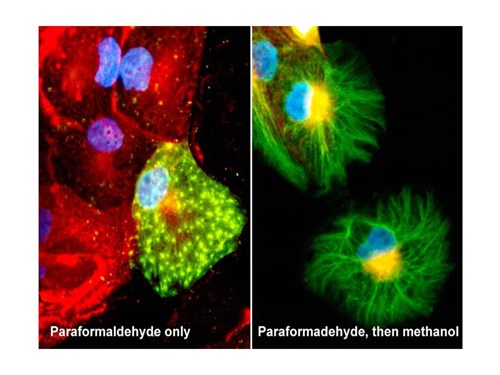
Most protocols using formalin or formaldehyde fixation also employ a second permeabilization step, using either detergents (ranging from mild to moderate, saponin/digitonin, 0.1-0.5% Triton-X100, NP40) or organic solvents such as methanol or acetone. (It goes without saying that fixation with organic solvents require no additional permeabilization steps!) An example of permeabilization efficacy is seen in figure below.

Figure above: Cells fixed with paraformaldehyde (PFA) only (L), or paraformaldehyde followed by methanol (R), and stained for a carbohydrate antigen (red) and a a cytoskeletal protein (myosin, green). The myosin staining shown in the right image is more ‘true’, however the carbohydrate surface staining present in the left image has been removed by permeabilization with methanol (R). The green staining in the cell (L) indicates a leaky cell, in which a number of small holes have been formed by PFA fixation through which the antibody could gain partial access to the interior (the bright spots). More rigorous permeabilization on the same cell type (R) allows the antibody into the cell to detect the entire cytoskeletal network, largely inaccessible in most of the non-permeabilized cells (L). Whether the cell (L) was leaking before the formaldehyde treatment, or leaking was caused by the fixation process, is unknown. What is clear, however, is that without the image on the right, it could be erroneously concluded that only a few cells contain the antigen and it stains in a punctate pattern.
Choosing antibodies
Some antibodies only recognize a small region of a target molecule — such is the nature of monoclonal and peptide-specific antibodies that are raised against small regions of a much larger protein. Many commercial antibodies fall into this category, but there are antibodies available that originate from whole-protein antigens too. These polyvalent antibodies contain a whole blend of clonal antibodies, each recognizing a small part of a larger whole (see figure 3).
In general, the more polyvalent the antibody, the higher its affinity, which is especially valuable for localization, immunoprecipitation, and immunoblotting studies. However, do not completely rule out monoclonal and peptide-specific antibodies. From personal experience, antibodies raised against whole proteins can exhibit selectivity to a subset of the whole molecule — for instance the two subunits of the tetrameric heterodimer you’re working on that happen to be the “wrong” part of the protein. High-affinity, single-epitope antibodies are also invaluable for detecting phosphorylation sites, O-GlcNAc modification, and specific conformational epitopes.
Using a combination of the two — polyvalent and single-epitope antibodies — enables one to not only identify a protein, but assess its functional state as well.
Key things to remember
Often the problem with immunostaining isn’t the antibody or the cells, but the staining procedure itself. Sticking to a stringent protocol generally works fine when staining the cell surface, but intracellular staining is a different matter; characteristically, it involves detecting small molecules on interior cell structures using much larger ones (native antibodies are quite large!) Holes in the cell membrane must be opened, and they must be large enough to allow antibodies access to the cell interior whilst the complications caused by their presence should be mitigated as practically as possible.”
As Nancy has highlighted in this article, there is no one-fits-all scenario when it comes to immunostaining intracellular targets, especially for the first time. Get to know the limitations of each method at your disposal; what can this immunostaining method tell you over that, and what can’t it show you? Treat each new antibody and antigen differently and test a battery of different immunostaining techniques for each antigen-antibody combination. Use the generous advice Nancy has given here as a starting point and also look out for the modular immunostaining protocol she has kindly written up for us in a future post!
Proteintech tip: When purchasing commercial antibodies check they are fully guaranteed. This enables you to try new antibodies, confident that you will have success at no extra cost.


