
Enhance your IP and IF experiments with nanobodies and antibodies
Enhance your IP and IF experiments with nanobodies and antibodies
Video Transcription
Hello everyone. And welcome to our technical talk on enhancing your immunoprecipitation and immunofluorescence experiments in nanobodies and antibodies. This talk will be presented by Dr. Astrid Sitte, the ChromoTek product manager, and by myself, Dr. Rebecca Northeast, the technical specialist for Proteintech Europe.
Introduction to Proteintech
So, just going to start with a quick company introduction. At Proteintech, we have been the original manufacturer of antibodies, ELISA kits, and proteins since 2002. We recently became ISO accredited, which means that we can manufacture GMP-grade cytokines and growth factors for use in cell and gene therapies. Proteintech has polyclonal and monoclonal antibodies against 13,000 targets. Within that, antibodies against two and a half thousand targets have had their specificity verified by knockdown-knockout validation. This year we launched CoraLite fluorescent-dye antibodies for use in direct immunofluorescence and protein medics for use in western blocks.

The main difference between Proteintech and other antibody suppliers is that we manufacture every product ourselves, and you can only buy our products with our label on it. By cutting out the middleman and not allowing anyone else to sell our products under their label, we offer you complete transparency. This means more lot-to-lot consistency because IT can guarantee supply in addition to our huge library of original validation data direct from the lab with complete quality control over our antibodies, making sure it works in your hands.
As a company, we measure our scientific success by your scientific success, specifically helping you publish impactful research faster. This graph shows that over our company history, our products are featuring in more and more publications each year. And as of today, we have over 70,000 publication citations.
ChromoTek became part of the Proteintech group in 2020. ChromoTek's mission is to support extraordinary discoveries with high-performing nanobody based reagents for proteomics and cell biology; striving to improve, accelerate, and simplify research around the world. They have over 15 unique products with over two and a half thousand citations. Today, Dr. Astrid Sitte will present the immunoprecipitation slide and myself, Rebecca Northeast will present the immunofluorescence.
Part 1: Immunoprecipitation
General Protocol
Welcome everybody to today's talk on the use of antibodies and nanobodies in immunoprecipitation and immunofluorescence. My name is Astrid, and I would like to start with the first part, immunoprecipitation or short, IP. Immunoprecipitation is a technique to isolate your protein of interest out of a protein extract using an antibody. And you see here three main steps. The first step is the binding step; the step where your protein of interest binds to the antibody and to the beads. And the second step, the unbound proteins are washed away. And then the last step, your protein of interest is eluted from the antibody. You see here, the general protocol that comprises at first, the lysate step or the preparation of the cell validate followed by pre-clearing. Then there comes the extra IP, the binding, and the washing step. And finally, the elution and the analysis of your protein of interest in SDS-PAGE or by Western blotting.
There are different factors that influence the outcome of your IP for example, the selection of the matrix and selection of the binding proteins. Also, how you treat your protein during the cell lysate step. You can optimize the antibody binding, washing, and elution steps as well. I would like to go with you now through all the steps. Let's start with the comparison of the different matrices that are available. There are three common bead types, agarose, magnetic agarose, and magnetic particles M-270, and they're all different in their specifications. Agarose beads and magnetic agarose beads are porous, while magnetic particles M-270 consists of a solid core. The binding capacity is different as well. It's high for agarose and magnetic agarose, and lower for magnetic particles M-270. And the separation of agarose beads can simply be done by centrifugation and while you can use a magnet for magnetic agarose and magnetic particles M-270.

Depending on the antibody that you use for numeral precipitation, you also have to think about the protein. So protein A or G that you use for the mobilization, and there's a clear preference. So for example, the Mouse IgG2a antibody can bind to protein A or to both protein G. While Mouse IgG1 antibodies only bind to protein G very well. So that's good if you check in advance which type of protein you need depending on the species and subclass of your antibody. Also, you can change the mobilization strategy of the antibody. The most common strategy is to simply incubate your antibody with protein A or G beads, and then you have a non-covalent interaction. If you need a more stable interaction, you can add an additional cross-linking step so it will irreversibly cross-link the antibody protein G beads. And the highest stability is reached when you conjugate your antibody directly to the beads by a covalent interaction.
Coming now to the lysate step. So depending on your protein of interest, you can usually play around with the buffer composition of the cell lysate buffer. The standard lysis buffer which works well for most cytoplasmic proteins consists of a tris buffer with some sodium chloride and also detergent. When you work with nuclear proteins and you can use RIPA buffer, and depending on your protein of interest, you should also add additional supplements to your lysate buffer, for example, protease inhibitors or DNAase. If you're working with membrane proteins, you might think about the higher concentration of detergents. And some proteins also require reducing agents for example.
Troubleshooting / DOs and DON'Ts
On this slide, here are now some dos and don'ts for the antibody binding step. It's important that you don't incubate your protein of interest too long. Usually, an incubation of one hour is sufficient, otherwise, you will only increase the binding of cellular proteins- so the unspecific binding of cellular proteins. The mixing should be gentle too. It's important to keep the beads in solution, but usually, a slow rotation is sufficient. When it comes to the volume, volume range of 200 to 500 microliters is recommended when you work with a 1.5-milliliter tube. If your volume is smaller, then you cannot ensure the proper mixing, and when your volume is higher then you dilute your sample too much. And to keep your protein happy, you should also try to treat it as gentle as possible, and work at four degrees, and use mild buffers.
When it comes now to the washing step, you can use a harsher buffer because you would like to get rid of all the cellular proteins that you're not interested in. So you're going for example, to use a higher concentration of detergent than the binding buffer or higher salt concentration. And because of the harsher conditions, you should try to keep the washing steps as short as possible. So only mix for several minutes and only do a three to five repeats. That's often sufficient. And also try to keep the volume in the range of one to 1.5 milliliters. If you use a larger volume, for example, it may be that you lose a little bit of your protein of interest.
Now for the last step, for the elution step, there are three different options available. The common one is acidic elution where you use for example 200 millimolar of glycine buffer. This low pH buffer leads to the disruption of the interaction between the antibody and the protein of interest, but because of the low pH it’s very important that you immediately neutralize after the elution step. When you work with a tag protein, so when you have a protein of interest with a tag, then you can also think about proteolytic illusion. Therefore, you need a cleavage site between your protein of interest and the tag value. Simply incubate your protein of interest when it still bound to the antibody and with the beads at the eluate contained your native protease of interest, but you also have to remove the protease afterward. And the last probably most popular elution option is to use SDS sample buffer and to boil your sample for a couple of minutes, this way you denature your antibody and the protein of interest, and your sample is ready to be analyzed on SDS-PAGE or by western blotting.
Antibodies and Nanobodies
Now, when it comes to the right selection of the tools that you would like to use for your experiment when you work with endogenous proteins, we recommend that you use an antibody for the immunoprecipitation. Proteintech has over 4,000 targets validated for the IP and 13,000 targets are validated, for western blotting. And then there’s 2,500 targets have been validated and knockdown or knock out samples. So Proteintech not only offers the right tools for the immunoprecipitation but also for the western blot analysis afterward. And this is shown here on the right side with one of our popular antibodies against the protein ZO-1, which is a tight junction protein and cell polarity marker. And you can see that this protein was nicely precipitated with the antibody. And also the same antibiotic could be used for the analysis on western blotting afterward.
When you don't work with endogenous proteins, but when you have your protein of interest overexpressed in the cells with an additional tag, then you can also think about using nanobodies for the immunoprecipitation. Here's a short summary about nanobodies: I think you're all familiar with the traditional antibodies that consist of heavy and the light chain from animals like camelids such as alpacas or llama, for example, they have an additional special type of antibody, which only consists of the heavy chain, and they're called heavy-chain antibodies. And the nanobody is shown here in green, which is actually the binding domain of the heavy chain antibody. The nanobody has a size of only 15 kilodaltons which is much smaller than an antibody, and it can be directly conjugated to beats for immunoprecipitation, and then it's called a nano-trap.
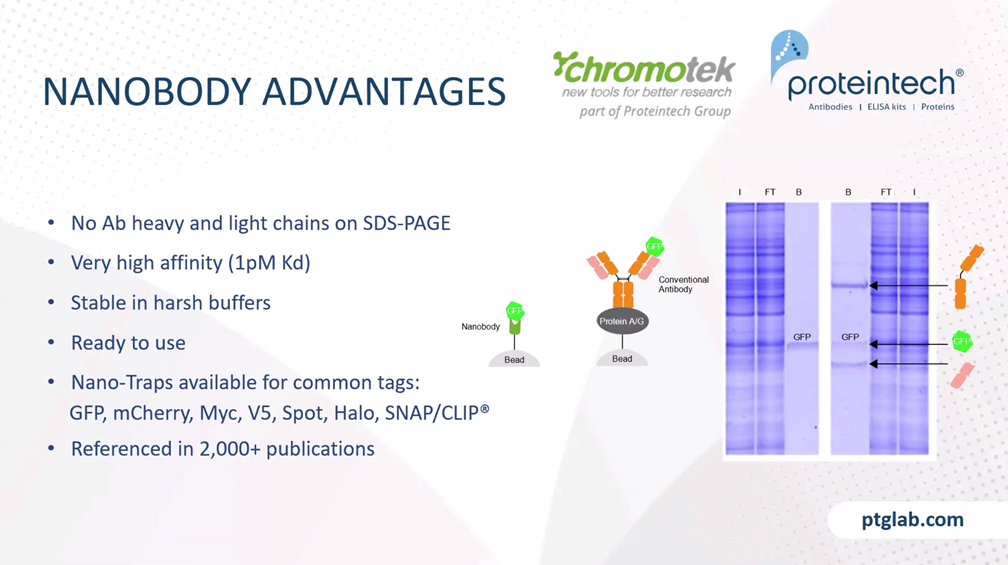
The advantages of nanobodies in immunoprecipitation are that you have no antibody heavy and light chains on the SDS-PAGE, because you only have a small nanobody of 15 kilodaltons, which is covalent linked to the beads, and nanobodies can have a very high affinity to their targets. For example, our GFP nanobody has an affinity of one picomolar to its target GFP. Nanobodies are small and they are covalently linked to the beads therefore you can use harsh washing, wash them first to get rid of your whole-cell proteins, and because of the covalent linking, it's ready to use. Nano-Traps are available for common tags, such as GFP, mCherry, also small peptide tags like Myc or V5 tag, spot tag, and also tags like Halo or SNAP/CLIP tag. And the Nano-Trap product line is already referenced in more than 2000 publications. And with this, I would like to hand over to my colleague, Rebecca, who now presents the immunofluorescence part to you.
Part 2: Immunofluorescence
Introduction
Thank you Astrid. My name is Rebecca Northeast, and I'm going to take over the second half of that talk, talking to you today about immunofluorescence. So first an introduction to the terminology and commonly used anagrams in immunofluorescence. Immuno simply refers to the binding of an antibody to an antigen. ImmunoHISTOchemistry is antigen detection within tissues, and immunoCYTOchemistry is antigen detection within cells. The basic premise behind immunofluorescence is when an antibody binds to the desired antigen in your sample, after which a secondary antibody is then added which binds to the primary antibody. And this secondary antibody contains a fluorophore, which emits a wavelength of light in response to excitation. IF allows multiplex interactions, whereby you can image multiple proteins providing that your primary antibodies are raised in different hosts or have different IgG subclasses, and so it can be selectively targeted by your appropriate secondary antibody. The overall protocol for IF is relatively straightforward. It starts with fixation, followed by permeabilization for intercellular targets, followed by blocking steps to minimize non-specific binding, and then antibody incubation followed by mounting and analysis. Sufficient wash steps must be performed to ensure that any unbound antibody is removed and reduce background signal. We have our product specific protocols for all our antibodies, which detail the optimal looking conditions and dilation and incubations that we have found to work best for us in our in-house validations.
Protocol optimizations
Before starting an immunofluorescence experiment, you first need to consider your sample preparation for optimum results. Cells are seated onto glass cover set support fixation, which at the time should have a confluency of around 50% to yield optimal staining. If this is too high then you get deformed cell architecture and High background. If this is too low, then you get incorrect cell patterning. Tissues should be cut at sections of around five to 10 micrometers thickness. If this is too thick, then you get stronger signals, but you can also get poor resolution and high background. If this is too thin, then your samples may be easy to damage and difficult to embed. Tissues and cells need to be fixed before staining to prevent structures falling apart.
If you're having issues with the immunofluorescent staining, then changing the fixation types can potentially have large beneficial effects and results. Paraformaldehyde essentially acts by creating covalent cross-links pulling together proteins to form an insoluble meshwork. Organic solvent fixatives such as ethanol or acetone acts by dehydrating cells to cause proteins to precipitate in situ. Ethanol and acetone are good as they conserve cellular architecture, however, they can cause damage to certain epitopes and cause a loss of lipid components.
Following fixation by a cross-link fixity, cells must then be permeabilized in order for antibodies to reach intracellular targets. If you want to target interior membranes, such as nucleus or organelles and strong non-ionic detergent, such as Triton-X must be used. If you're only looking at a cytoplasmic target, and a mild detergent such as Digitonin is good for this as well. SDS is another cellular permeabilization agent and this acts by partially denaturing cross-links and revealing inaccessible epitopes. Remember if organic solvent are used as a fixated, no permeabilization is required as the nature of the organic solvent means that cell plasma membrane is already broken down.
Antibodies
When choosing your primary antibodies, you need to decide if you’re going to use a polyclonal or monoclonal antibody. In general, polyclonal antibodies are more traditionally used for IHC. And this is because polyclonal antibodies are raised against the whole protein antigen, and therefore have multiple IgGs against different epitopes and have a high affinity. Monoclonals are have just one epitope, and this has high specificity and a less likely to cross-react. Monoclonals are the best if your antigen is highly abundant. When trying out a new antibody, we recommend you perform a titration experiment, whereby you vary the dilation and incubation in other to ascertain the best signal-to-noise ratio. When purchasing a new antibody, things to look for are the number of citations, and also easily accessible validation data from the manufacturer in the application that you are looking to use it in. When choosing secondary antibodies, be aware of the host species of your primary antibody, ensuring that this will correctly label your primary. Monoclonal raised in mouse can also have different IgG subclasses. To ensure that your secondary recognizes this, then it needs to be IgG, heavy and light specific. Alternatively, mouse monoclonals can be multiplexed if they have different isotopes such as IgG1 or IgG2a, with irrelevant isotope specific secondaries. When multiplexing, ensure those spectral profiles do not overlap. And when choosing your fluorophore, be aware of the different properties, for example, conventional versus synthetic dyes. Conventional dyes such as FITC are less bright and less photostable. Synthetic dyes such as Alexa and Coralite are best when using confocal as they photobleach less readily.
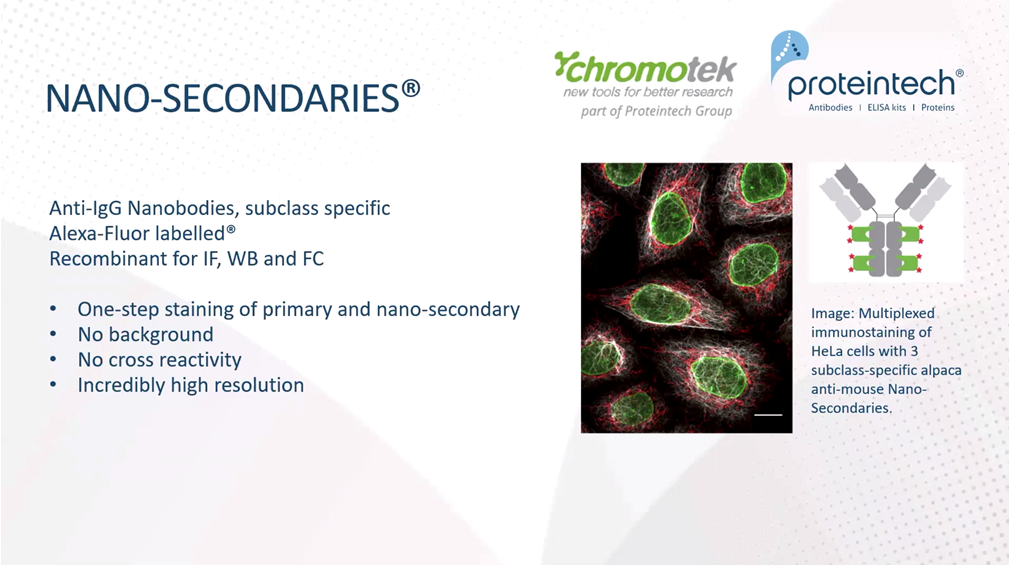
ChromoTek has a line of nano-secondary antibodies. These are anti-IgG nanobodies, which are subclass specific and Alexa-fluor labeled. They are recombinantly produced for use in IF, WB. Nano-secondaries have a one-step staining protocol of primary and secondary antibody incubation in the same step. With high-affinity binding to that antibody. There is no background and no cross-reactivity as well allowing incredibly high resolution. When using traditional antibodies for IF, you can either take a direct or indirect approach. Direct involves the primary antibody being directly conjugated to fluorophore whereby you have crisper signal and decreased background. You do not have the signal amplification effect whereby multiple tagged secondaries bind to one primary. As mentioned, direct is beneficial for a shorter protocol with less background, however, it is not recommended for lower abundant targets and also limits flexibility in multiplex design.
At Proteintech, we have recently launched a new range of our popular monoclonal antibodies directly conjugated to our CoraLite fluorophores.
Troubleshooting
Now moving on to some common troubleshooting problems, starting with absent or poor signal. If you have absent or poor signal, the first you need to check is that your microscope is working by using a positive control sample of our slide. Another thing to check is that you are using the correct filter for your fluorophore. Another reason for losing activity could be that your antibody has lost activity. Therefore, either use a new lot and also check if your antibodies have being stored correctly according to your manufacturer's instructions. Poor signal may also be due to damaged epitopes through things such as over fixation. It might be necessary to perform an antigen retrieval step, especially when looking at former fixed tissues. Non-specific binding or high background could due to poor permeabilization for nuclear targets. It also might be due to too high antibody concentration. So perform trial titration to optimize for antibody incubation. On the right here, we can see the anti-Clathrin antibody. When you use it at the higher concentration of 1 in 100, actually has background staining, as opposed to the clear staining that you can see when it's 1 in 500. High background can also be due to insufficient washing and dried samples, and this can be mitigated simply by increasing the number and the length of your washes.
Autofluorescence is a common problem, especially in fixed tissues. Always include an endogenous staining control whereby you omit the primary and secondary antibodies from your buffers, then perform everything else as you would normally. This will help to assess the level of autofluorescence in your sample. Autofluorescence occurs due to cross-link fixation with formaldehydes from certain amino acids, fluorescent properties. Even in the red blood cells is also strongly also addressing. Most autofluorescence is in the green spectrum. And as you can see in this unstained image of a human FFPE kidney sample, the green filter has more obvious biological landmarks than the red filter. So one way to get around this would be to use red/far-red fluorophores such as the CoraLite 594 and CoralLite 647. You should also fix your samples for the minimum time required and perfused tissues with PBS to remove any red blood cells and also the strongly fluorescence molecules heme. Commercial reagents such as TrueView are also available, which is really good at reducing autofluorescence from all sources. Thank you very much for listening.