直接サンドイッチELISAの構築ガイド
Reshma Patil博士著
ELISA法とは?
酵素結合免疫吸着測定法(ELISA:Enzyme-linked immunosorbent assay)は、ペプチド、タンパク質、抗体、ホルモンといった可溶性物質を検出・定量するために考案された生化学分析の手法です。本稿では、ELISAの実験系の構築を成功させる方法やトラブルシューティングについて、必要な材料、プロトコール、トラブルシューティングのポイントを網羅的に紹介します。
ELISAは、大量のサンプルを効率的に処理できるように考案されているため、迅速かつ容易に測定を実施できます。極めて高い特異性と感度を示すELISAアッセイは、わずか0.01 ng/ml程度の低濃度の抗原や抗体を検出することが可能です。ELISAでは、抗原‐抗体複合体が固相表面に固定化されます。この複合体を構成する分子の1つに酵素を共有結合させて酵素特異的な基質を添加することで、定量可能な呈色反応産物が生じます。
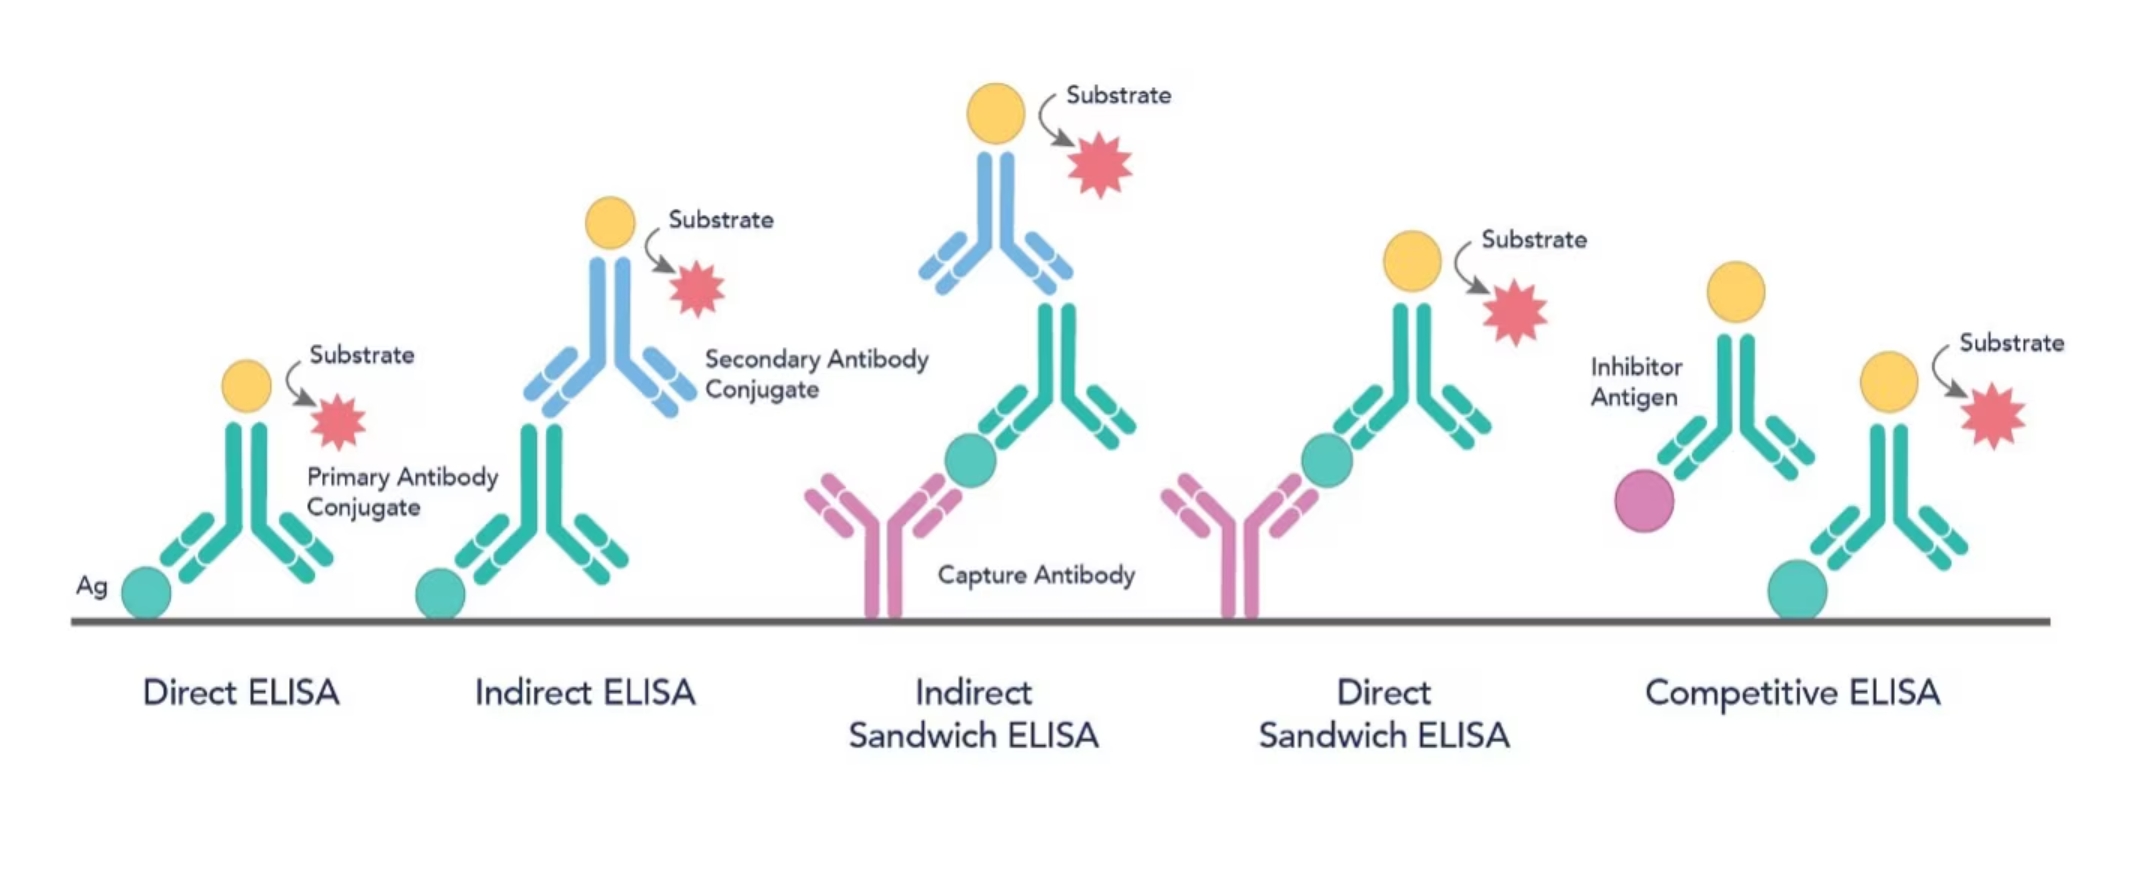
実験に用いるELISA法を選択する際には、直接法、間接法、サンドイッチ法、競合法といった選択肢の中から最適な方法を検討することが重要です(図1)。その中でも、サンドイッチELISA法は、比類のない高い感度と特異性で分析対象物を検出することができる方法です。

図1. 5種類のELISA法の模式図
直接サンドイッチELISA法
直接サンドイッチELISA法では、プレートに結合させた捕捉抗体と酵素を標識した検出抗体の2種類の特異的抗体の間に抗原を挟んで捕捉することによって抗原を検出します。
直接サンドイッチELISAを構築するために用意するもの
-
マイクロプレート:一般的には、96ウェルプレートを使用します。アッセイの種類やターゲットに応じて、高結合表面または中結合表面のウェルプレートを使い分けます。
-
捕捉抗体(Capture Antibody):検出対象となる特定のタンパク質と結合する、モノクローナル抗体、ポリクローナル抗体、組換え抗体のいずれかを使用します。
-
コーティングバッファー:捕捉抗体をウェル表面に吸着させる際に使用します。通常は、炭酸‐重炭酸バッファー(pH 9.6)やPBS(pH 7.4)を使用します。
-
サンプル・スタンダード溶液:サンプルを溶解・希釈した溶液と、既知濃度の抗原またはその他のターゲットタンパク質を溶解・希釈した溶液を指します。ELISAに供する一般的なサンプルとしては、血清、血漿、細胞培養上清、尿、だ液、組織のホモジネート溶液、脳脊髄液等が挙げられます。
-
ブロッキングバッファー:BSA(ウシ血清アルブミン)、脱脂粉乳(スキムミルク、Non-fat dry milk)、市販されているブロッキング用溶液等を、非特異的吸着を防ぐ目的で使用します。
-
検出抗体(Detection Antibody):HRP(Horseradish peroxidase)等の酵素が標識された、捕捉抗体が結合するエピトープとは異なる領域に結合する、モノクローナル抗体、ポリクローナル抗体、組換え抗体のいずれかの抗体を使用します。
-
基質溶液:HRP標識抗体を使用する場合はTMB(3,3',5,5'-Tetramethylbenzidine)を使用し、その他の酵素を使用する場合はその酵素に適した基質を使用します。
-
反応停止液:TMBを基質として使用する場合は1N硫酸を使用します。
-
洗浄バッファー:Tween-20を0.05%含有するPBSまたはTBS(トリス緩衝生理食塩水)を使用します。
-
ピペット・チップ:バッファーやサンプルを正確に計量するために、適した容量のピペットとチップを使用します。
-
マイクロプレートリーダー:吸光度または蛍光の測定に使用します。
プロトコール

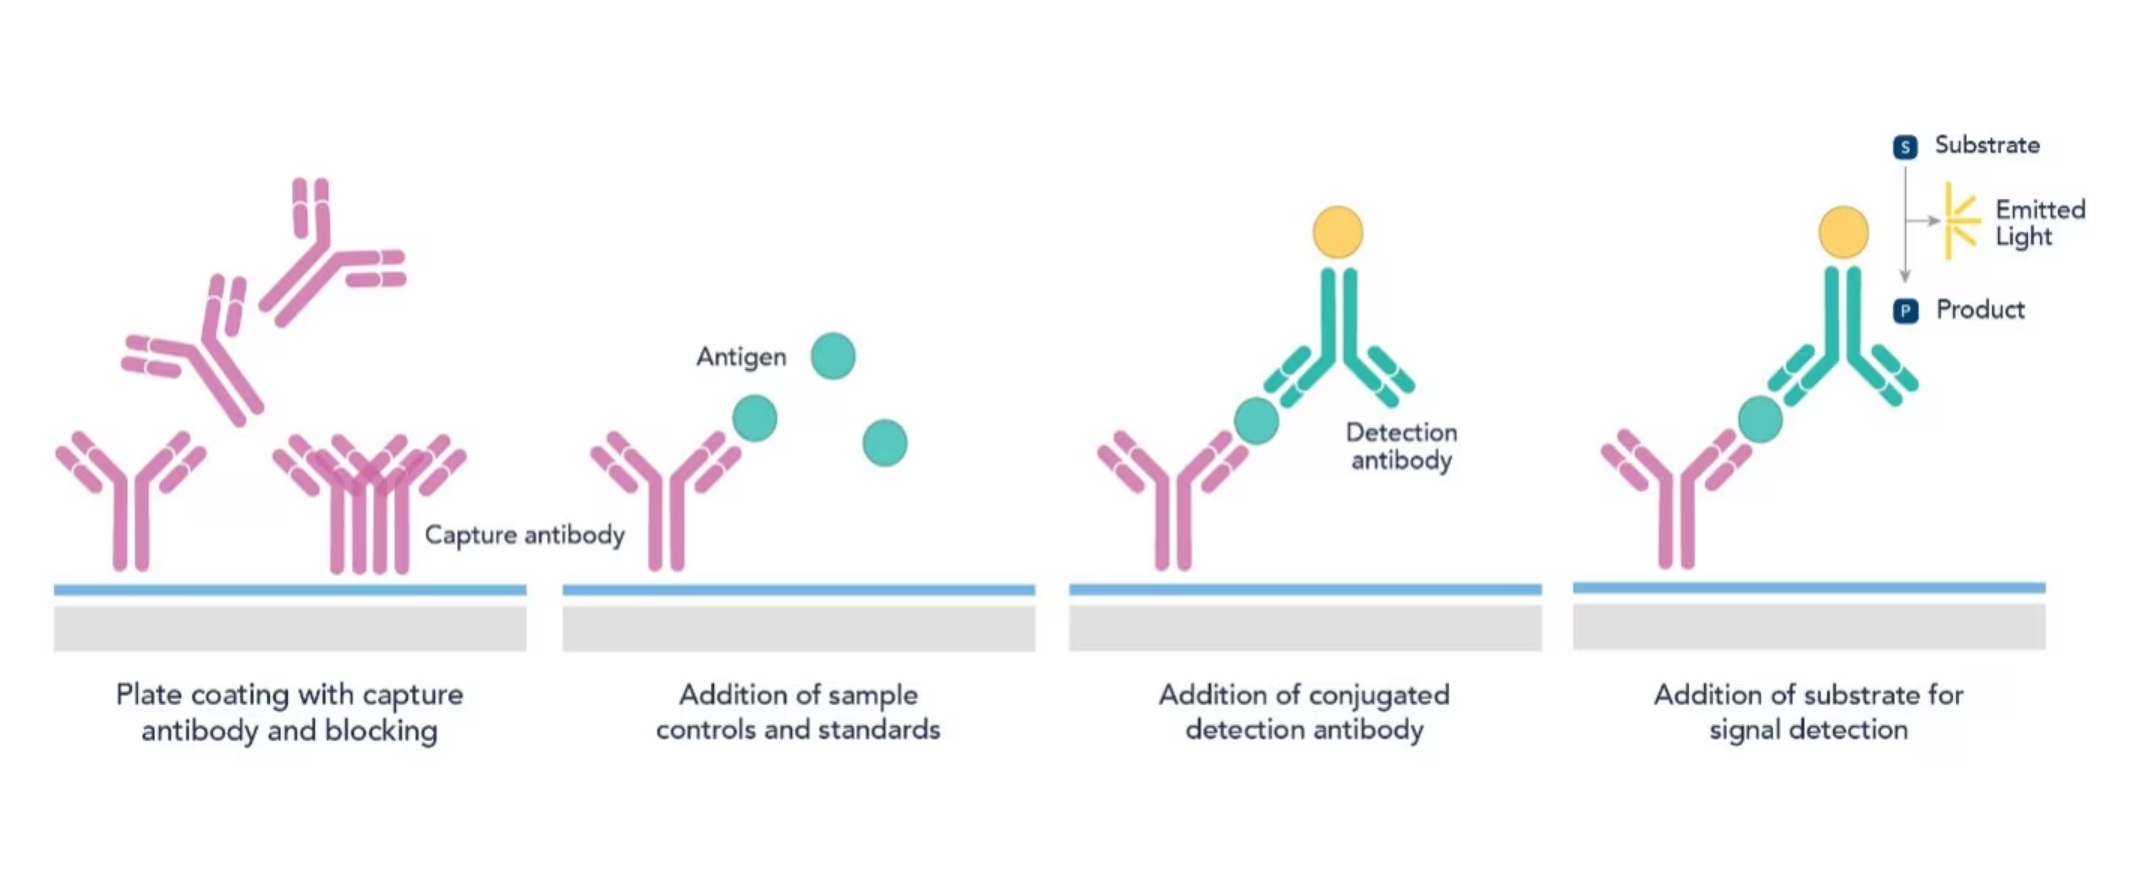
図2. 直接サンドイッチELISA法のプロセス
Step1:プレートのコーティング
最初に、捕捉抗体を炭酸‐重炭酸バッファー(pH 9.6)で1~10 µg/ml程度の濃度に調製した溶液でマイクロプレートのウェルをコーティングします。抗体溶液を添加して、プレートを4℃で一晩インキュベーションすると、抗体がウェルに吸着します。
Step2:ブロッキング
コーティング溶液を除去し、各ウェルにブロッキングバッファー(例:1% BSA含有PBS溶液)を添加して、検出抗体やその他のタンパク質が非特異的に結合するおそれのあるプレート上の領域をブロッキング剤で被覆します。非特異的結合を防ぐために、ブロッキングバッファーを添加したプレートを室温で1~2時間、または4℃で一晩インキュベーションします。その後、ブロッキングバッファーを除去し、PBS等の洗浄バッファーで3~5回洗浄してプレートに結合しなかったブロッキング剤を除去します。ブロッキングは、以降の手順で非特異的結合が発生するのを軽減するうえで極めて重要な作業です。
ブロッキングを実施する理由とは?
ELISA用プレートのコーティングは、生体分子をウェル表面に捕捉・固定化する受動的な結合工程です。ブロッキングを実施しないと、抗原や検出抗体がプレート上に非特異的に結合し、バックグラウンドが高くなって感度が低下する原因となります。何も結合していない状態の結合部位にブロッキング剤を飽和させることで、非特異的な相互作用を防ぎます。ELISAの反応溶液の液量(100 µl)よりも多量のブロッキング溶液(200 µl)を使用して、ウェル全体をブロッキング剤で被覆するよう留意します。
Step3:サンプル・スタンダード溶液の添加
各ウェルに、希釈したサンプル溶液(例:血漿、血清、細胞ライセート)や既知濃度のスタンダード溶液を100 µl添加します。サンプルは、アッセイで想定される測定可能な濃度範囲(一般的に1~100 ng/ml)に収まるように希釈バッファーやブロッキングバッファー等に適切に希釈します。サンプル・スタンダード溶液を添加したプレートを37℃で90分、または4℃で一晩インキュベーションします。
ELISAにおけるコントロールの重要性とは?
アッセイの正確性を検証するために、実験では必ずポジティブコントロールとネガティブコントロールを共に測定します。アッセイで適切に反応が生じていることを、ポジティブコントロールで確認します。同時に、偽陽性や非特異的結合の有無をネガティブコントロールで確認します。
Step4:洗浄
各手順の合間に、洗浄バッファーでウェルを何回か洗浄して残存する結合しなかった物質をすべて除去します。特に、サンプル溶液と抗体をインキュベーションした後は必ず洗浄を実施します。
Step5:検出抗体の添加
各ウェルに、酵素等を標識した検出抗体を希釈した溶液(一般的に0.1~1 µg/ml)を100 µl添加し、室温で2時間インキュベーションします。インキュベーション後は必ずウェルを洗浄バッファーで3~5回洗浄して、結合しなかった検出抗体を除去します。
Step6:基質の添加
ウェルを洗浄後、酵素基質を各ウェルに添加します。検出抗体に標識された酵素と基質が反応し、溶液は測定可能な呈色を示します。例えば、TMBは一般的にHRPと組み合わせて使用されます。基質となるTMBを添加して15~30分インキュベーションした後に硫酸を添加し、酵素反応を停止させます。
Step7:結果の測定
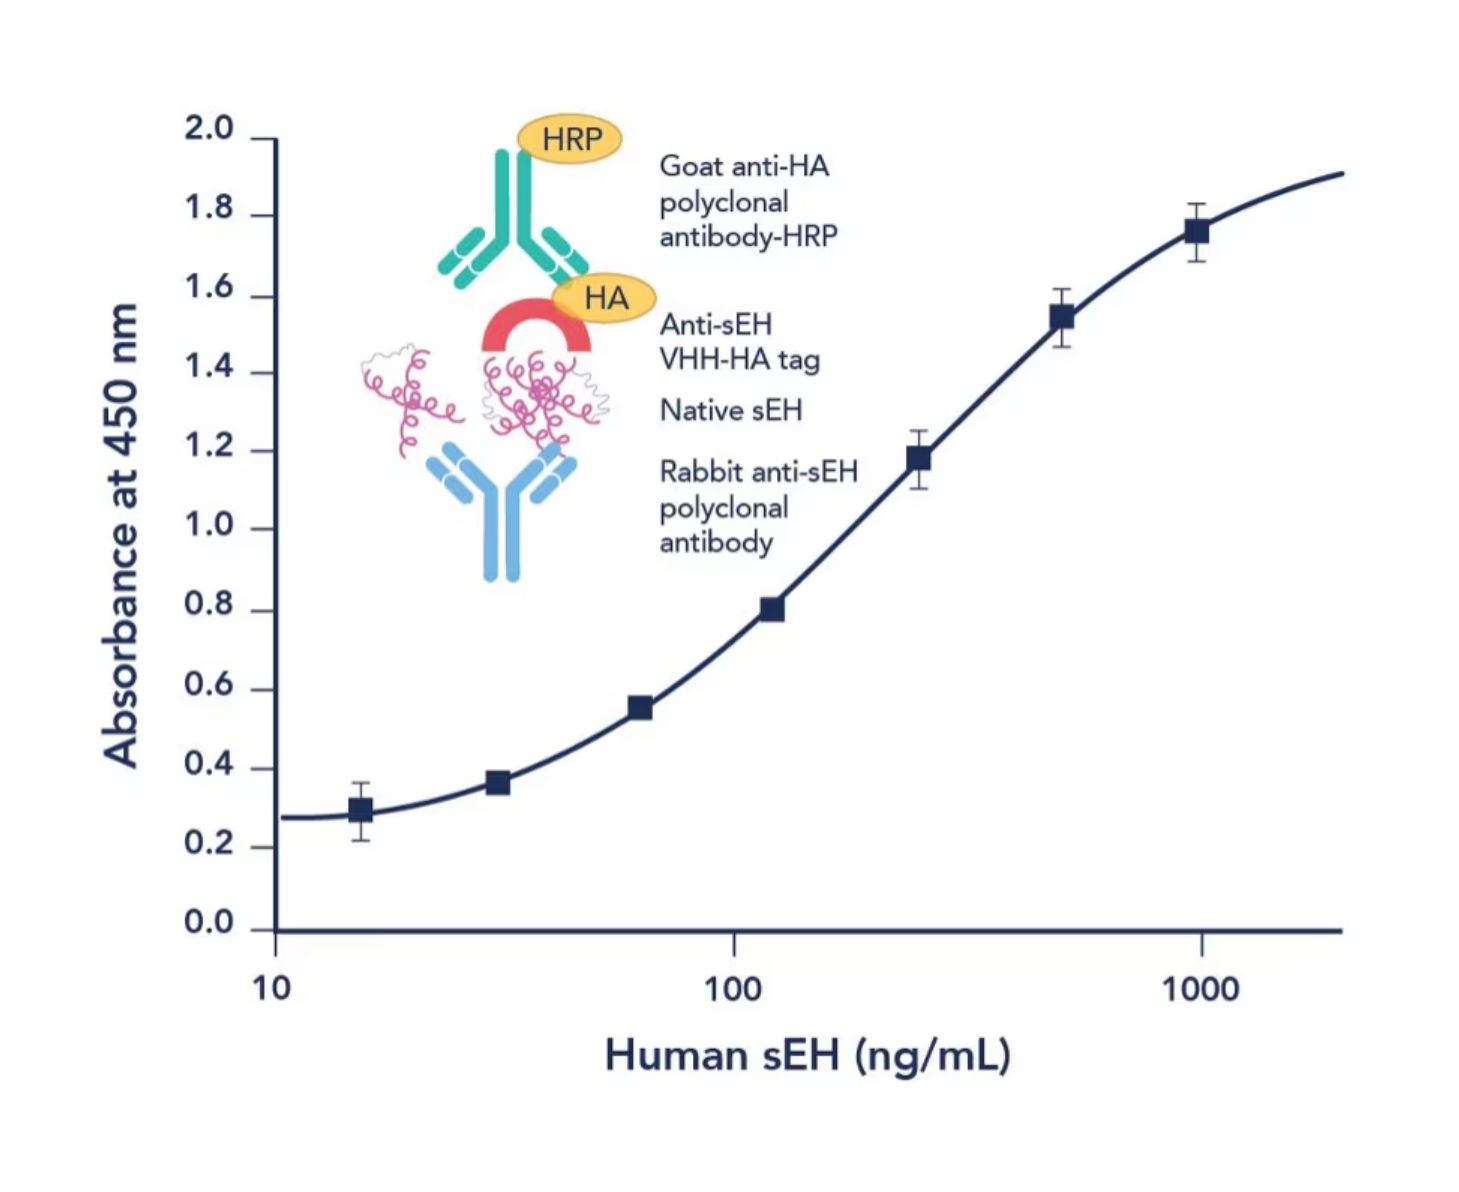
マイクロプレートリーダーを使用して、適切な波長(例:TMBの場合は450 nm)で各ウェルの吸光度を測定します。呈色強度は、サンプル溶液中の抗原濃度に比例します。そのため、既知濃度の抗原溶液をスタンダード溶液にして作成した検量線と比較することで、サンプル溶液の抗原濃度を定量することができます(図3)。

図3. サンドイッチELISA法の模式図と標準曲線(検量線)
留意すべきポイント
-
サンプルの取り扱い:凍結融解を繰り返さないように留意しましょう。凍結融解を繰り返すと、安定性の低いタンパク質が分解され、アッセイの結果に影響を及ぼします。また、サンプルの採取方法や各プロセスは常に同じ手順で実施しましょう。
-
使用する試薬類を室温に戻す:ELISAを実施する際は、プロトコールに明記されていない限り、すべての試薬を室温にしてから使用することが重要となります。試薬類の温度を室温に戻すことで、アッセイ間の結合速度がある程度一定に保たれるだけでなく、試薬類の析出を防ぎ、反応の一貫性を保つことができます。
-
適切なピペッティング技術を習得する:ELISAで実施すべきベストプラクティスとして、液量を適切に計量できるピペットを選択すること、ピペットを斜めに構えてチップがウェルの底面に触れないように分注すること、サンプル間やスタンダード間のクロスコンタミネーションが生じないようにピペットチップは都度交換すること等が挙げられます。
-
プロトコールを遵守する:再現性の高い結果を得るには、キットに添付された説明書であれ、インハウスの手順であれ、必ずプロトコールの通りに実験を実施しなければなりません。守るべき事項としては、サンプルの前処理は毎回同じ方法で実施すること、常に最適化されたアッセイ条件を採用すること、インキュベーション時間や温度は指示通りに実施すること等が挙げられます。一般的に、インキュベーションを実施する場合は、実施時間を1時間あたり±5分を超えて変動させないことが推奨されます。
-
コントロールサンプルやリファレンススタンダードサンプルも同時に測定する:コントロールサンプルは、データ解析とアッセイパフォーマンスを検証するために使用します。コントロールサンプルは、プレートのウェル位置による測定ばらつきを検出できるように配置することが推奨されます(多くの場合コントロールやリファレンスの測定にはウェルの両端を使用します。例えば、8×12の96ウェルプレートの1列目と12列目をコントロールサンプルの測定に使用する場合は、A1-D1とE12-H12にはポジティブコントロールを配置し、E1-H1とA12-D12にはネガティブコントロールを配置する等、測定値に偏りが生じないか確認できるように工夫しましょう)。
よくあるトラブルシューティング
1:バックグラウンドシグナルが高い
-
考えられる原因:ブロッキングが不十分なために非特異的な結合が発生している可能性があります。
-
解決策:ブロッキング剤の濃度を上げる、あるいはブロッキング時間を延長します。
2:シグナルが弱い・シグナルが観察されない
-
考えられる原因:ターゲットタンパク質の捕捉または抗体のコーティングが不十分な可能性があります。
-
解決策:適切な濃度のコーティング溶液を使用し、十分なインキュベーション時間を確保します。
3:一貫性のある結果が得られない
-
考えられる原因:サンプルの取り扱いの差異、あるいはインキュベーション時間の変動が結果に影響を及ぼしている可能性があります。
-
解決策:サンプルの取り扱い手順を標準化し、すべての手順を定められた時間通りに実施します。
4:ウェル間の測定値にばらつきが認められる
-
考えられる原因:ピペッティング操作やウェルの液量が一定ではない可能性があります。
-
解決策:キャリブレーションしたピペットを使用し、分注前の溶液を完全に混合しておくように留意します。また、インキュベーション中に溶液が蒸発しないような措置を講じましょう。
最後に
ELISAは、適切な試薬や器具を揃えて細かいポイントに注意を払えば、容易に構築可能な実験手法です。この多目的に利用可能なアッセイは、研究室や臨床検査において極めて有用なツールです。本稿で述べた手順に従い、実験のポイントとトラブルシューティングを実践すれば、信頼性が担保された再現性の高いサンドイッチELISAの結果を得ることができます。
プロテインテックのELISA関連製品
- ELISAキット:タンパク質、サイトカイン、増殖因子、ケモカインを検出する各種キットを取り揃えています。
- 一次抗体:ELISA構築にご利用いただける検証試験済みの抗体を19,000種類以上取り揃えています。
Primary Antibodiesのドロップダウンメニューから抗体のタイプを選択してください。 - マッチドペア抗体:特別に検証試験を実施した捕捉抗体と検出抗体の抗体ペア
参考文献
- Y Cui, et al. Heavy chain single-domain antibodies to detect native human soluble epoxide hydrolase. Anal Bioanal Chem. 2015 Sep;407(24):7275-83.
- John R. Crowther. The ELISA Guidebook Second Edition. Methods in Molecular Biology. Humana Press, Totowa, N.J. 2008 Dec 19.
- B K. Van Weemen, A H.W.M. Schuurs. Immunoassay using antigen-enzyme conjugates. FEBS Lett. 1971 Jun 24;15(3):232-236.


